David Mearns – Search Director, The Finding Sydney Foundation
The top objective of today’s ROV dive to HMAS Sydney’s debris field was to identify the largest sonar target, which I was confident was Sydney’s detached bow. This was achieved, along with many other objectives, very early in a highly successful dive that lasted over 17 hours and yielded another 421 still photographs. For all the difficult and frustrating time we endured dealing with technical problems and awful weather, the results over the past several days have truly been worth the wait many times over.
Sydney’s debris field yielded up a large amount of her superstructure and deck equipment that we found missing from her hull. Our finds included: the bow, director control tower and roof of the compass platform, both masts, the radial engine and possible framing of the Walrus aircraft, the entire aircraft catapult, an intact funnel, the high angle control station, one of the port side 4-inch high angle guns, a couple of 0.5-inch machine gun mounts, five of Sydney’s wooden boats, one of the quadruple torpedo mounts with 2 torpedoes still loaded and one loose torpedo, various winches and spools of wire, a gas mask and a number of loose shoes.
Nearly everything found in the debris field listed above, excluding the bow, would have been ripped away from Sydney by the enormous water forces as she sank at rapid speed. The general absence of twisted and torn hull plating in the main debris field tells me that it is probable Sydney did not suffer any large explosion in her bow. It seems increasingly likely that Sydney’s bow, severely damaged and weakened by the torpedo strike, broke away with Sydney pointed on a heading of 140 degrees, and still possibly underway. All the evidence indicates that the weather and sea conditions worsened on the evening of November 19th and rough seas may have played a factor in Sydney losing her bow and finally sinking. A number of other WWII ships were torpedoed in the bow like Sydney but none lost their bows, nor sank. Desperately unlucky, Sydney appears to be the first.
Glenys McDonald - Director, The Finding Sydney Foundation (Observer)
On Saturday I saw team work at its best. At 11.15am we commenced a detailed inspection of the Sydney debris field and almost immediately we came onto the entire main mast complete with Crow’s Nest. As we moved over targets our collective pool of expertise, photographs and plans of HMAS Sydney on hand in the survey room assisted greatly. John Perryman did an incredible job for us this day.
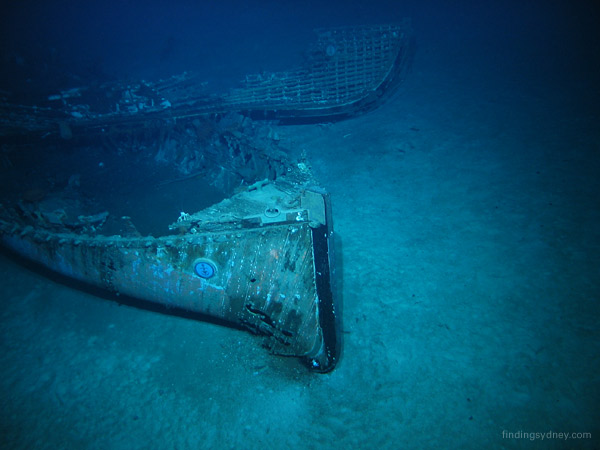
There was anticipation as we approached our second target which we believed to be the bow of Sydney. The bow was inverted with both anchors and numerous scuttles (port holes) visible. The scuttles were counted from the bow to the break to determine the break had occurred in the vicinity of water tight bulkhead No 5.
The amount of debris logged and photographed is too extensive to go into here, but at various times the excitement mounted as we struggled to identify objects, some of them badly tangled or upside down. One such piece was the Director Control Tower with part of the Bridge roof lying over it. The ROV team did a superb job filming every detail of this structure, and the sharp edges of some of the debris meant that the ROV crews had to be particularly skilled. Where possible we zoned in on objects, for example we were able to read the brand “Barnett” on a rubber tyre.
The greatest and most overwhelming part of a long day however was the finding of five lifeboats. These all sat pale and ghostly on the sea floor, still proudly displaying their anchor emblem, white with a blue anchor on some boats and blue with red anchor on another. In one case we located one lifeboat resting over the other.
The finds continued to fill us with awe. Just prior to a tea break we saw the first of many black shoes. A torpedo trolley caused debate for some time as did a piece of debris with letterbox like slits. This turned out to be a boat cradle base. There was various shell cartridges and one torpedo, not far away from where the torpedo tubes, with two torpedoes still in the right hand side were located.
By 04.00am we had completed (and I had logged) the traverse of the debris field. I called it a night and went to bed, it had been a day that words cannot even begin to describe and I am so privileged to have been part of it.
John Perryman – Senior Naval Historian (Observer)
Having spent two days concentrating on surveying the wreck of HMAS Sydney (II) it was now time for us to venture into her nearby debris field some 450 meters to the north of her position.
We had tracked a number of large contacts of interest strewn amongst the debris field on our side scan sonar during the search phase, and it was now time to try and determine what these were. We closed up in the survey room in Geosounder shortly after 11:00 and twenty minutes later the ROV came upon Sydney’s foremast lying on the seabed. This was readily identifiable by its height, wire aerials and the distinctive crow’s nest which was still affixed to the masthead.
Having obtained imagery of the foremast, the ROV was maneuvered toward the next large contact which turned out to be Sydney’s severed bow lying upturned on the sea floor. Both of her anchors were all the way home in the hawse pipe and secure. We were able to determine where the bow had severed by counting the scuttles aft of the anchors. Totaling six, we concluded that the bow parted approximately 66 feet from the stem of the vessel. Lengths of chain cable were strewn in the vicinity of the bow and an inspection of the bows opening revealed that all of the forward decks within it had collapsed.
The ROV then carried out an inspection of the sea bed for other significant pieces of debris. Before long we came across a large structure which we were initially unable to identify. After some time we determined that it was actually two large pieces lying on top of each other. A close investigation soon revealed that we had found the distinctively shaped flat bridge roof top, resting over the front of the Director Control Tower.
As the afternoon progressed we identified numerous pieces of wreckage including the a funnel, ships aircraft catapult, aircraft engine, starboard forward 4-inch Mk V gun, 20-inch searchlight, port 12-foot UK-1 rangefinder and five of Sydney’s nine boats.
The discovery of the boats in the debris field was both remarkable and sobering. We were able to identify several different types of boats ranging in size from 27-foot whalers to the larger 35 and 36-foot motor cutters. Distinguishing features included the presence/absence of propulsion and the type of build such as clinker or carvel. Some showed signs of damage by gunfire and in one instance two of the boats were resting on top of one another. This certainly supported our earlier assessment that few of Sydney’s boats were launched following the action. The most striking feature, however, was the presence of Sydney’s badge mounted proudly on the bows of all boats found. These carefully hand painted coloured icons remain in tact, undisturbed, and will continue to serve as a silent epitaph to HMAS Sydney (II) and her valiant crew.
Dr. Michael (Mac) McCarthy – Curator of Maritime Archaeology, WA Museum (Observer)
The examination of the HMAS Sydney debris field commenced at 1110H on Saturday 5 with the ROV’s arrival at the first of many targets plotted by Williamson and Associates Senior Geophysicist Mike Kelly and Senior Survey Technician Brian Bunge. They had remained on board from the search phase.
The survey finished at 0430H on Sunday 6 with all absolutely exhausted especially the ROV team, Mike and hydrographic surveyor Nigel (now dubbed ‘the Navigator’) Meikle. He was supported by survey technician Hannes Vanroyen. The nearly 18 hour survey was an immense drain on all, the pressure, the hours of staring at the video screen and monitors, the fatigue, all occasionally showing. Mike Kelly had worked virtually non-stop calling distances and bearings to the ROV pilots, quickly responding to David Mearns’ requests for updates, bearings, distances, heights and information as he worked to fit all that was unfolding into his store of experiences and expectations. He had planned and was now executing the inspection phase in the debris field meticulously and to a pre-ordered plan, refusing to be sidetracked.
For his part John Perryman proved amazingly quick and effective in drawing on the plans of HMAS Sydney he had copied to the Sea Power Centre laptop, on the contemporary photographs and on images from the HMAS Sydney model in the War Memorial. Using these and his own experience on naval ships he rapidly identified all bar a few of the features encountered and to help explain the pieces missing from each, for few, if any, were intact. Each large target numbered S1-S13 and a host of smaller items seen en route like shoes; cartridges (including some embedded vertically in the seabed); paint tins; and the like were logged in time and position. Glenys MacDonald and I also kept individual chronological manual logs of findings, adding descriptions and identifications as they were made. I also plotted the ROV’s course on Mike Kelly’s map of the debris field. This had been overlaid on his and Brian’s sidescan sonar record. David, John and Glenys will have described many of the significant ‘finds’ in their blogs.
The totally unexpected appearance of the first of the ship’s boats saw Glenys Macdonald flourish some of her photographic collection. These showed some of them in operation and together with John’s detailed plans allowed us to quickly identify each type and the external fittings and fixtures on them. To me, seeing the frames and the remaining ghostly strakes of planking on the carvel vessels was one of the most striking images of my archaeological career. Then to find the largest boat, diagonal planked, square-sterned, with the skeletal remains of a carvel cutter across its gunwhales was even more remarkable.
At 1155H, Sunday back down in the survey room after rising at 0800 to write up and prepare for this next phase, I finish with the note that the badges on each boat were another of the most evocative images I have ever seen. Without exception these retained their features, their emblems and colours apparently undiminished on each bow. Not wishing to appear too effusive I could not help thinking as I looked at them of the shoulder patch on John Perryman’s naval overalls in which he always appears. Under the naval ensign appear the words ‘These Colours Don’t Run’.
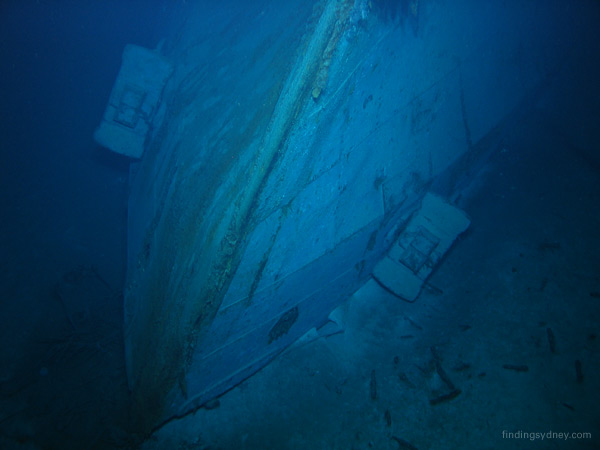
Above Photograph: Sydney’s inverted bow was our first major discovery within the debris field.
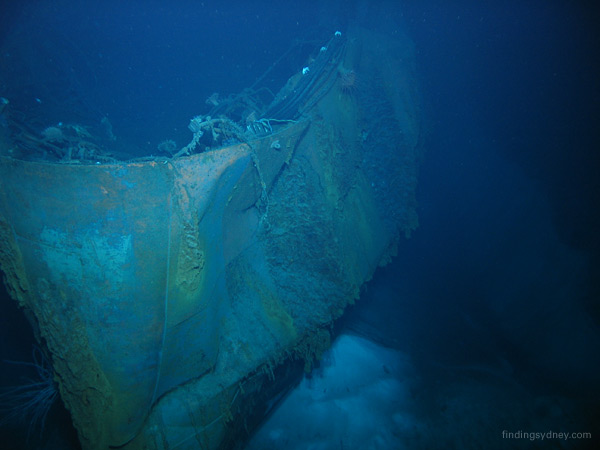
Above Photograph: The buckled stern and collapsed quarterdeck clearly indicated that Sydney had struck the sea floor stern first.

Above Photograph: The crow’s nest sitting atop Sydney’s downed foremast.
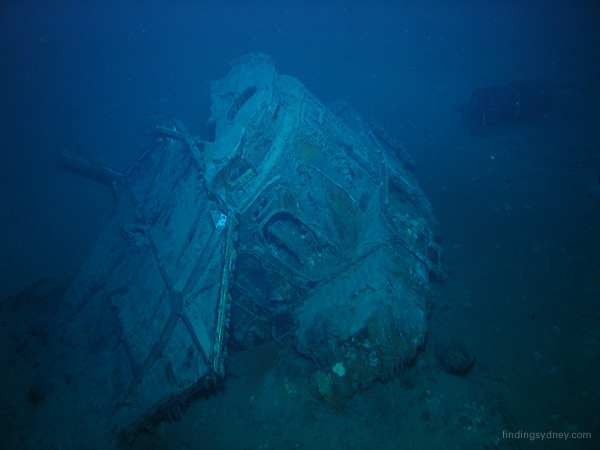
Above Photograph: The distinctive bridge deck head (roof) lying against the front of the Director Control Tower.
Above Photograph: Without doubt the most chilling find in the debris field was the presence of five of Sydney’s life boats. Note Sydney’s official badge mounted on their bows.
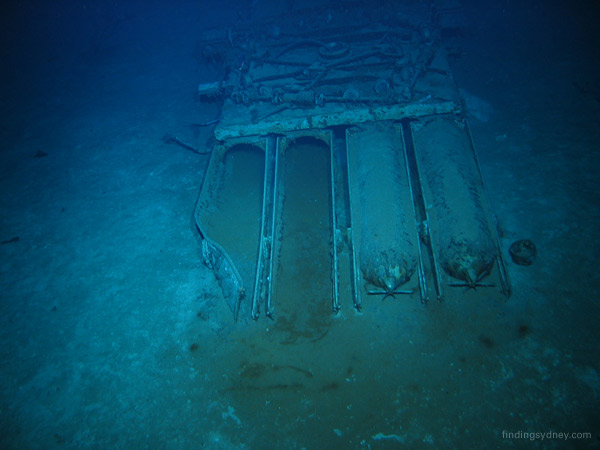
Above Photograph: One of Sydney’s 21-inch quadruple torpedo tubes lying upside down on the sea bed. Two torpedoes remain in their tubes.
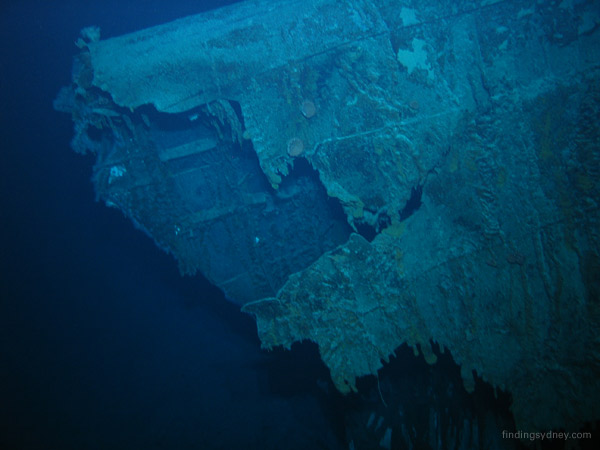
Above Photograph: The area of impact where Kormoran’s torpedo inflicted fatal damage on Sydney’s upturned bow section.
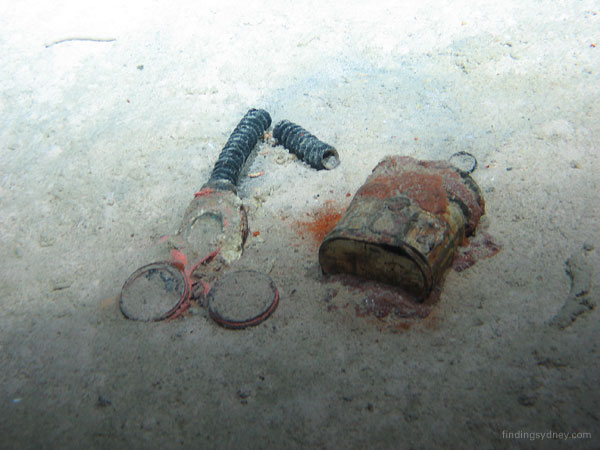
Above Photograph: Gas Mask on sea bed.
Photo Gallery Slideshow available at http://www.findingsydney.com/gallery.asp
IMPORTANT NOTICE: The Material (including photographs) available in the "Press Room" section of this Website may be used/reproduced unaltered by your organisation (unless stated otherwise within the content description) subject to the terms and conditions set out in the Legal Section AND any Material (including photographs) which you use/reproduce must credit the source as "The Finding Sydney Foundation" and, as an option, you may also link the source statement with the website address http://www.findingsydney.com/.
Photographer: David Mearns